Rendering Text (Part 1): Next.JS Sanity V3 and Code Blocks
August 19, 2023
How To Render Code Blocks with Sanity/Code-Input and PortableText
Sanity CMS
A Tech Blog Without Code Snippets?
A necessary feature that needed immediate attention for my new blog was implementing code-block or simply being able to write code snippets into my blog posts.
- This is an instructional step by step guide to actually setting up the sanity/code-input plugin.
- See part 2 for resolving React Portable Text 'code' type errors.
Part 1. Configuring the Schema
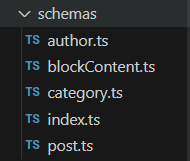
Within the generic directory structure, there is a Schema folder which houses the Schema Definitions.
The definition files are a collection of defined objects that use pre-set fields (key-value pairs) to create entities like an Author, or a Post, and describe the properties of these entities.

The properties of these individual files utilize Sanity API's helper functions, which essentially create type-safe (rigid, well-defined key-value pairs) objects.
Here is a schema file defining the Post object, of type document:
import {defineField, defineType} from 'sanity'

export default defineType({
  name: 'post',
  title: 'Post',
  type: 'document',
  fields: [
    defineField({
      name: 'title',
      title: 'Title',
      type: 'string',
    }),
    defineField({
      name: "description",
      description: "Post Description...",
      title: "Description",
      type: "string",
    }),
...
 defineField({
      name: 'body',
      title: 'Body',
      type: 'blockContent',
    }),
  ],
})
Note that there is a body field with type: 'blockContent'
defineField({
      name: 'body',
      title: 'Body',
      type: 'blockContent',
    }),
This "body" field, of type 'blockContent', is where this current text is input, for example. It is one of the fields when creating a Post in the CMS. The blockContent has it's own definition file, as it is its own type. So refer to this type definition file: blockContent.ts.
Add the following code snippet to the array within the schema object of blockContent.ts:
...
defineArrayMember({
      name: 'code',
      title: 'Code Block',
      type: 'code',
    }),
     // You can add additional types here. Note that you can't use
     // primitive types such as 'string' and 'number' in the
     //same array as a block type.
    defineArrayMember({
      type: 'image',
      options: {hotspot: true},
    }),
...
The Post text input should now have the "Code" toolbar in the block.
Part 2. Retrieving (Serializing and Rendering the Code) in React
One blocker encountered was the react-portable-text plugin for Sanity. PortableText is a rich text rendering library, and by default, it was unable to handle custom block types such as "code".
Errors encountered were in the form:
[@portabletext/react] Unknown block type "code", specify a component for it in Serializers.types/Components.typesSolution: A Custom React Component
In order to resolve this, one needs to create a custom React component that receives the 'language' and 'code' fields from the defineField object specified in your body schema.
import React from "react";
import Prism from "prismjs";
import "prismjs/themes/prism-tomorrow.css"; // Import the dark theme

const CodeBlock = ({ language = "javascript", code = "" }) => {
  if (!language || !Prism.languages[language]) {
    console.warn(`Prism does not support this language: ${language}. Defaulting to JavaScript.`);
    language = "javascript";
  }

  const grammar = Prism.languages[language];
  const highlightedCode = Prism.highlight(code, grammar, language);

  return (
    <pre className="code-block m-0 p-4 bg-black rounded-lg overflow-x-auto max-w-full">
      <code
        className={`language-${language} block text-white text-sm`}
        dangerouslySetInnerHTML={{ __html: highlightedCode }}
      />
    </pre>
  );
};

export default CodeBlock;
Note again, that 'language' and 'code' were props passed from the schema types in the block's defineArrayMember():
defineArrayMember({
      name: 'code',
      title: 'Code Block',
      type: 'code',
}),
Render the Custom Component
Within the page that is forming the front-end rendering of your components, the <PortableText/> component was not sufficient because, again, it couldn't delineate or even allow us to define the 'code' type. So we simply map through the post.body keys and check whether it's a 'code' type or the familiar 'block' type:
- PortableText can handle the familiar 'block' type using RichTextComponents, and we use that to simply render the text
- but if it's a 'code' type then we use our custom component to render the text.
Here, the check between 'code' and 'block' is made in the renderBlockContent function:
import React from "react";
import CodeBlock from "./CodeBlock"; // Assuming you have a CodeBlock component
import PortableText from "@portabletext/react"; // Assuming you have a PortableText component
import { RichTextComponents } from "./RichTextComponents"; // Assuming you have RichTextComponents defined

function renderBlockContent(block) {
  if (block._type === "code") {
    return <CodeBlock code={block.code} language={block.language} />;
  }
  // If there are other custom types you want to handle, you can add more conditions here.

  // For standard text blocks:
  return <PortableText value={block} components={RichTextComponents} />;
}
...

return(
  ...
  <div>
      {post.body.map((block, idx) => (
           <React.Fragment key={idx}>
           {renderBlockContent(block)}
           </React.Fragment>
      ))}
  </div>
)
